TL;DR
- Canless LED recessed lights cost $145-$225 per can with attic access; $185-$325 in two-story homes without attic access above. Treat those as published ranges on this page.
- Layout is room- and listing-specific. One can per 16-20 square feet and a 4-foot grid are starting points, not a 200 sq ft rule.
- Fixture type (IC, non-IC, canless) follows the ceiling assembly listing. Dimmer pairing and color temperature follow the lamp and control listings.
- Bright Pro Electric matches licensed electricians. It does not install recessed lighting.
- A typical 6-8 can living room install takes 3-5 hours with attic access, including dust protection and cleanup.
Recessed lighting is the single highest-impact lighting upgrade most San Diego homes can make. A dim living room becomes evenly bright. A dark hallway becomes welcoming. A kitchen with one builder-grade fixture becomes a usable workspace.
Here’s what it actually costs to install, how to lay them out properly, and the three install mistakes worth avoiding.
How much do recessed lights cost per can?
For canless LED recessed lights with attic access in a typical single-story San Diego home:
- Per-can install: $145 to $225 each depending on quantity and ceiling complexity
- Per-can install in a 2-story home (no attic above first floor): $185 to $325 each (fishing through finished ceilings is more work)
- Per-can install in a vaulted or coffered ceiling: $225 to $425 each depending on access
- Dimmer switch added to control the cans: $185 to $295 per dimmer (LED-rated, like Lutron Diva LED+)
- Smart dimmer (Lutron Caseta) added: $245 to $345 per dimmer
The per-can cost drops slightly when you do more in a single visit. Six cans in one room costs less per-can than two cans in three different rooms because the access setup, dust protection, and ladder time amortize.
How many cans does your room actually need?
A starting point some electricians use: one can per 16–20 square feet of floor area for general illumination. It is not a room-size rule.
| Room size | Starting-point can count |
|---|---|
| 100 sq ft (small bedroom, office) | 4 cans |
| 150 sq ft (medium bedroom) | 5–6 cans |
| 200 sq ft (typical living room) | 6–8 cans |
| 300 sq ft (large living room) | 9–12 cans |
| Hallway (per 8 linear feet) | 2 cans |
These numbers assume 6-inch cans with 800–1,000 lumen LEDs (equivalent to a 60–75-watt incandescent). If you use 4-inch cans (smaller, more decorative), increase the count by ~25%. If you’re going for accent lighting (over a kitchen island, art wall) rather than general illumination, the math is different.
How should you lay out recessed lights?
For general room lighting, follow this:
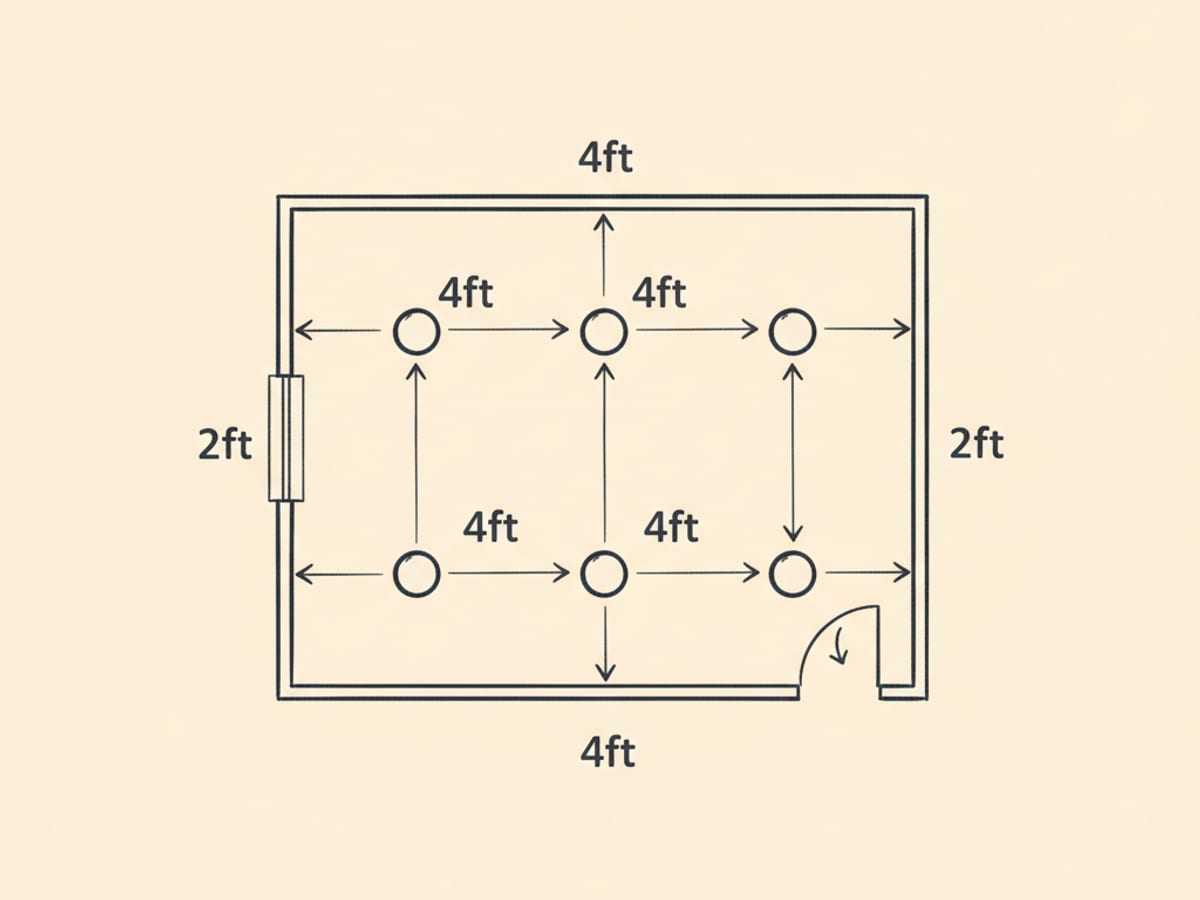
- Cans 4 feet apart in both directions (sometimes 3 feet for higher-impact spaces)
- Cans 2 feet from any wall (closer makes wall-wash look uneven)
- Even grid pattern rather than asymmetric placement (resist the urge to “be creative” with general illumination; even spacing reads as deliberate, asymmetric reads as random)
For task or accent lighting, follow these:
- Over a kitchen island: 2–3 cans evenly spaced, centered above the island, 30–36” apart
- Over a sink or vanity: 1–2 cans centered, slightly forward of the sink edge (so you’re lit from in front, not above)
- Wall-wash for art or feature wall: cans 2–2.5 feet from the wall, aimed toward the wall, every 4 feet along it
What are the three install mistakes that cost twice to fix?
1. Wrong dimmer for LED loads
Older incandescent dimmers don’t handle the lower wattage of LEDs cleanly. Result: buzz, flicker, or limited dimming range. The wrong dimmer is the #1 reason homeowners say “my LEDs look bad.”
The fix is a dimmer swap. Lutron Diva LED+ ($28), Leviton Decora SureSlide ($25), or any LED-rated dimmer made in the last 5 years works. Licensed electricians typically stock LED-rated dimmers for the visit and can swap an incompatible dimmer in the same trip as the can install.
2. Color temperature mismatch
LED bulbs come in a range of color temperatures, measured in Kelvin (K):
- 2700K (warm white): like incandescent, warmest, most flattering for living spaces and bedrooms
- 3000K (soft white): slightly cooler, common for kitchens, balanced
- 3500K (neutral): neutral, good for offices and task areas
- 4000K+ (cool white / daylight): cool, looks “blue” in residential settings, only appropriate for garages, workshops, or specific commercial use
For 95% of San Diego homes, 2700K or 3000K is what you want. Homeowners sometimes install 5000K daylight cans from a big-box store, then ask to swap them because the room feels cold. Pick before you install.
Most quality canless cans now have selectable color temperature built into the can (a small switch lets you pick 2700K, 3000K, 3500K, 4000K, or 5000K). A common default is 2700K for living/bedrooms and 3000K for kitchens unless you specify otherwise.
3. Wrong can type for the ceiling situation
Three real can types matter:
- Canless LED downlight (no separate housing; the LED + driver is integrated into a flat disc that mounts directly into the ceiling cutout). Slim, easy to install, listing still has to match the ceiling assembly. Our default recommendation when the listing fits. ~$25–$40 per fixture.
- IC-rated standard can (with a separate housing that allows insulation contact). Necessary when the can will be in contact with attic insulation and you want a traditional bulb-style fixture. ~$30–$60 per housing + bulb.
- New construction can (housing pre-installed during framing before drywall). Used during remodels with open ceilings.
Picking the wrong can type means either heat-related fire risk (non-IC cans buried in insulation) or wasted budget (IC-rated housings when canless would have worked).
The electrician picks per ceiling. If you have insulation above the cans, use either a canless fixture listed for that assembly (including insulation contact where the listing requires it) or an IC-rated housing. Canless is not exempt from insulation-contact rules because it “doesn’t generate enough heat.”
How long does an install take?
For a typical living room (6–8 cans):
- With attic access above: 3–5 hours including dust protection and minimal patch
- Without attic access (2-story, fishing through ceiling): 5–8 hours
- With existing fixtures to remove and patch: add 1–2 hours
The electricians we connect you with do dust protection (drop cloths, plastic sheeting) before any cutting starts. Cleanup at the end. Most homeowners are surprised how clean a recessed install is when done right. One thing to note: if you’re adding cans in the attic space near HVAC ductwork, tell the electrician so the layout can route around it. An HVAC contractor can verify duct clearances if the layout is tight. Better to coordinate once than cut twice.
What about smart bulbs in recessed cans?
Some clients prefer smart bulbs (Philips Hue) in recessed cans for color-changing scenes. This works for standard-can recessed fixtures with screw-base bulbs, but not for canless (which has integrated LEDs). If you want smart color-changing recessed lighting, choose IC-rated standard cans and Hue bulbs at install time.
Frequently asked questions
How many recessed lights do I need in a living room?
Plan from the room and the listing. One can per 16–20 square feet and a 4-foot grid are starting points some electricians use. They are not a 200 sq ft rule. Keep cans off the walls per the listing so you do not get glare spots.
What color temperature should I use for recessed lights?
Use 2700K (warm white) for living rooms and bedrooms, and 3000K (soft white) for kitchens. Avoid 4000K+ in residential spaces. It reads cold and blue. Most quality canless LEDs now have a selectable switch so you can choose at install time.
Do recessed lights work with smart home systems?
Standard-can fixtures with screw-base sockets work with smart bulbs like Philips Hue for color-changing scenes. Canless LED fixtures have integrated LEDs and don’t accept bulbs, so pair them with a smart dimmer (like Lutron Caseta) for app and voice control instead.
How long does a recessed lighting install take?
A typical 6–8 can living room install takes 3 to 5 hours with attic access, including dust protection and cleanup. Two-story homes without attic access above run 5 to 8 hours because fishing through finished ceilings takes more time.
Related guides
If you’re updating lighting room by room, a ceiling fan swap is a natural companion project. Our ceiling fan installation guide covers box ratings, wiring requirements, and costs. For a detailed breakdown of per-can pricing, IC-rated fixture costs, and whole-house project totals, see our recessed lighting cost guide for San Diego. For a broader look at what electrical work costs across job types, see our electrician pricing guide.
Service area
Bright Pro Electric matches licensed electricians. It does not install recessed lighting. Use contact to get matched.